


What you can count on and what to expect on Laugavegur and other Icelandic trails. How to prepare for such a trip and how to organize it. Where to go and what to visit.
Most tourists get to know Iceland by driving around by car. This way you can relatively quickly see all, or almost all, of the island’s attractions. However, the real face of Iceland is not the crowded parking lots at the largest waterfalls. Most of the area of this beautiful island is empty, post-volcanic expanses, where it is much easier to meet a sheep than a human being. This side of Iceland is very much worth seeing as well, but for that you need to go on a full-day or, better still, a multi-day hiking trip.
Iceland’s most famous hiking trails
There are plenty of mountain huts, shelters and campsites in Iceland. And between them there are many hiking trails. The most famous multi-day trail is certainly Laugavegur, connecting Landmannalaugar and Thorsmork. Two other trails connect to it: Fimmvorduhals and Hellismannaleid. In total, it is possible to hike on these trails for up to more than 10 days, without descending to ‘real civilization’. Descriptions of these trails can be found in the linked articles. Less well-known, but also very interesting multi-day trails are set in the Kerlingarfjoll region and in the vicinity of the Askja volcano (the Askja Trail). But these types of multi-day trails are almost everywhere in Iceland. A beautiful few days of hiking is also provided by the Hornstrandir reserve in the far north, which is difficult to access. Finally, the most interesting routes for one day, sometimes not the whole day, are certainly a trip to Glymur waterfall, shorter routes in Landmannalaugar, Thorsmork and Kerlingarfjoll, an ascent of Mt. Esja, near Reykjavik, and several trails in Skaftafell reserve, on the southern coast. A specific and very interesting route is the walk to the hot mountain stream of Reykjadalur, above the village of Hveragerði. Both short and longer routes are worth weaving into the itinerary of a trip to Iceland. Doing the “set” Laugavegur + Fimmvorduhals + Hellismannaleid probably requires a separate trip, but the other routes can complement any summer trip. All these routes have many elements in common, or very similar. And you should prepare for all of them in a fairly similar way.
Where I book my own Iceland trips
Best Iceland deals
Selected partner sites, best prices
When to go trekking in Iceland
In Iceland, strictly speaking, there is no such thing as a mountain trail closure. The trail may be unsafe (e.g., snowy), shelters and campsites along its route may be closed, but there is no formal ban on entering them even in the middle of winter.
But, of course, trails are difficult to access in winter, and help may take a very long time to arrive if needed. Therefore, if you are not a fan of winter hiking, it is certainly best to go there in the summer – roughly from mid-June to mid-September, with July being the most convenient for sure. For those going on multi-day trips from Landmannalaugar and Thorsmork, the essential season is from mid-June to mid-September. That’s when huts, campsites and stores are open there, and that’s when you can get there comfortably by bus. On the other routes it is similar, but perhaps there are not so many facilities (stores, buses) and such a big difference between the number of tourists in and out of season. In July – compared to other months – Iceland is the warmest, least rainy and least windy. Of course, while we can realistically count on rain-free weather then, the lack of wind would be a complete rarity, as would temperatures above 25 °C (77°F). Regardless of the season, Iceland is still a fairly cool and windy island. In addition, the mountain trails, of course, are in the mountains, so temperatures there are lower and the wind is stronger than in Reykjavik, for example. June and July also have the longest days – even more than 20 hours pass from sunrise to sunset.
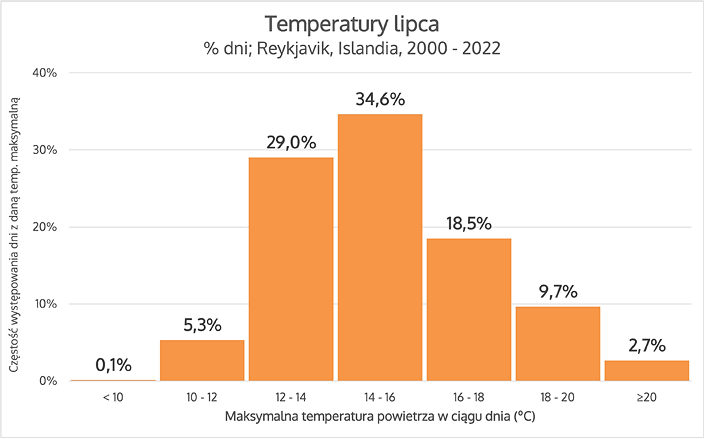
Typical July temperatures
We write much more extensively about the weather in Iceland in the article Weather in Iceland – temperature, wind, precipitation and encourage you to read it. Here we will only mention that even in summer, you can count on daytime temperatures above 15 °C (59°F), but rather not above 20 °C (68°F). For most visitors from Europe or North America this is spring weather, and not from some particularly warm spring. The situation is more serious if you go to the mountains and want to sleep in a tent. In the interior and the highlands, even in July (the warmest month), temperatures at night can drop below freezing (see the article Weather in different regions of Iceland). There can always be a frost, and temperatures below 10 °C (50°F) are completely normal.
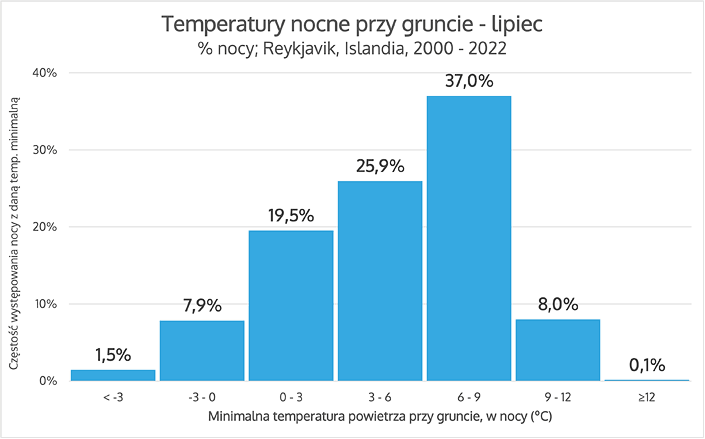
Typical air temperatures at ground level – July, Reykjavik, 2000-2022
We don’t have ground temperature data from the weather stations in the interior, but the chart above shows that more than half of the July nights in Reykjavik pass with ground temperatures between 3 and 9 °C (37-48°F), and almost 10% of those nights record temperatures below 0 °C (32°F). And yet, temperatures in the interior (see the article on weather in different regions) are about 2 to as much as 5 °C (4-9°F) lower than in Reykjavik. So when planning to sleep in a tent in the interior, you need to be ready for temperatures around freezing or even lower.
Getting to the hiking trails
Getting there is, unfortunately, quite a hindrance to organizing hiking trips and therefore largely defines the shape of the entire trip.

Bus departing from Landmannalaugar
The multi-day trails from Landmannalaugar and Thorsmork are best accessed by bus from Reykjavik. We can then get to the start, and after a few days take a return bus at the other end of the trail. We write about this in more detail in the aforementioned articles on Laugavegur, Fimmvorduhals and Hellismannaleid, respectively. It’s a good idea here to spend the night at the Laugardalur campsite in Reykjavik (or at the Dalur hostel there), as there is a bus stop right next to it from which these buses depart.

BSI around 6 a.m.
Alternatively, quite a few people arriving in Iceland at night choose to spend the remaining few night hours at the BSI bus terminal – the other departure point. The terminal doesn’t open until 3 a.m., but a small vestibule is open 24 hours a day. There’s also a luggage storage facility, and at the nearby N1 station you can buy, among other things, gas for your kettle. This is a sensible choice, because when going to the mountains you probably have a foam pad and sleeping bag with you anyway, so you can nap quite comfortably at the terminal.
For the other trails, it’s a bit different. We basically have to get to Glymur by our own car (or possibly by hitchhiking). Likewise to Kerlingarfjoll, but here we need a 4×4 car. By city bus we can get to trips near Reykjavik: to the small Úlfarsfell hill (lines 18 and 104, stop Skyggnisbraut) and the already quite large Esja (line 29, stop Esjuraetur).
By long-distance bus we can reach Skaftafell (line 51). Toward Askja we can get to Myvatn (57 to Akureyri and then 56), but the last 100 km (60 mi) from the Myvatn area to the volcano itself have to be covered by tour bus or on foot. Hornstrandir, on the other hand, can only be reached by ferry from Isafjordur, to which, unfortunately, buses (also) do not run.
Standard of Icelandic huts and campsites
Writing about Icelandic campsites, one fundamental caveat must be made: campsites in the lowlands (including, in particular, those along Route 1) and campsites in the interior are two different worlds. Campsites, hostels and guesthouses in the lowlands offer practically everything. Fully equipped kitchens, unlimited electricity, hot water, trash cans, Wi-Fi – all these are taken for granted as standard and naturally mandatory things.

Kitchenette at Emstrur-Botnar
Meanwhile, mountain huts – and even more so campsites in the interior – often offer only very basic comforts. And those staying overnight at a campsite do not have access to the hut at all, and therefore cannot use the kitchen, dining room or drying room in the hut. Huts, of course, offer protection from wind, rain and cold, but in many of them the sanitary facilities are outside. So if we want to take a shower, we have to brave the current weather (also because there is usually a line for the showers). At Laugavegur, each campsite also runs a small store, but on other trails this is rather rare.
At Landmannalaugar we have a hot spring, as do, for example, the huts at Laugafell, Laugarfell and Hveravellir. In Kerlingarfjoll the spring is about 1.5 km (1 mi) from the campsite.
Video: hot spring in Landmannalaugar
With few exceptions (e.g. Laugarfell, Fimmvorduskali) it is also possible to pitch a tent at each hut or shelter. Then we cannot use the hut kitchen, but we can use the sanitary facilities (which, however, does not always mean, for example, a shower…). Most campsites in the interior are poorly sheltered from the wind. Also, comfortable, soft, flat grass is rather rare on them. So when pitching a tent, you have to reckon with difficult, hard ground and weigh down the guy lines with rocks (which – fortunately – are usually in abundance). As a rule, there is also no access to electricity in huts and campsites. Sometimes charging your phone is possible for a fee, and sometimes it requires asking the warden very nicely. But most often it is simply impossible. Especially hard-to-reach huts and campsites also do not allow you to leave garbage. Sometimes they make an exception for aluminum cans and plastic bottles, but most of the trash we have to take with us and throw away at the next stop. Such places include Baldvinsskali, Hrafntinnusker and Emstrur-Botnar.

Exchange shelf at the Laugardalur (Reykjavik) campsite
There are special “exchange shelves” at many campsites. There we can leave food or equipment that we no longer need, or look through them for something we are missing. Realistically, we can count on this in places where tourists finish their trips – such as the campsites in Thorsmork and Grindavik. The exchange shelf in Landmannalaugar, on the other hand, is usually empty… You will certainly find the most free stuff at the campsite in Reykjavik (Laugardalur). Often something valuable can also be had from people returning their rental campervans. You won’t get free provisions for days this way, but some tea, pasta, jam, sugar, salt or dishwashing liquid – quite possibly. Everywhere you can pay for everything by credit card. Even if the campsite still has a coin-operated shower (such as Rjupnavellir or Emstrur-Botnar), we don’t need to bring coins with us – we’ll get them at the reception in exchange for a corresponding charge on the card.
Necessary fitness preparation
It is difficult to compare the difficulty of Icelandic trails with those elsewhere in Europe or in North America.
Iceland’s highest peak is Hvannadalshnúkur, which reaches as high as 2,110 m (6,920 ft) above sea level, but Icelandic trails rarely climb above 1,000 m (3,300 ft) above sea level. So it’s not high, although due to the location close to the Arctic Circle, we can easily encounter year-round snow at such an altitude. However, even if there is snow, most of the trails in Iceland are lowland in character. We walk on relatively flat and clear paths.

Snow on the Fimmvorduhals trail
Only in the most difficult places do the trails get steep and – often – loose. The trails in such places are sometimes secured with ropes and – less often – chains, but unfortunately these ropes and chains are also not very well maintained. Sometimes they are attached to the rock quite loosely and do not give a sense of security. So you have to be careful, because it is not difficult to have an accident.
Short trails – a few hours long

Trail to Glymur Waterfall
Short trails are usually a maximum of a few hours of hiking. The aforementioned trail to Glymur waterfall is about 6.5 km (4 mi) round trip, so a route for 3 hours, maximum 4. The loop to Svartifoss is under 4 km (2.5 mi), or up to 2 hours of walking. From the parking lot at Skogafoss, you can climb Fimmvorduhals as far as you feel like and come back. It is worth going up there even 2-3 hours, but the first beautiful viewpoints are encountered there after less than an hour of walking. The small Tindfjoll loop from Langidalur campsite takes 2-3 hours of walking, and the large one about 4 hours. In Landmannalaugar, the loop from the campsite through Blahnukur and Brennisteinsalda takes 4-5 hours of walking. So all of these are short trails. The kind for which we pack and dress just before going out, for which we don’t need to take food, and for which we only need water, and for which we are unlikely to go if it is raining or there is a hurricane wind. That’s why we don’t need any special preparation for them. Multi-day trails certainly require more attention.
Multi-day trails
Huts and campsites on multi-day trails in Iceland usually lie no more than 20 km (12 mi) from each other, and rather rarely closer than about 15 km (9 mi). When planning a route, then, you have to decide between a relaxed day of a single stage – 15 to 20 km (9-12 mi) – and a hard one of two stages, 30 to 40 km (19-25 mi).
At a walking pace of about 4 km/h (2.5 mph) on easy ground, plus the extra time every climb costs, that comes to daily stretches of 5-6 hours, or 10-12. In summer a day in Iceland is long (it can last more than 20 hours), but 12 hours of walking a day, usually with a heavy backpack, is still a great deal – so most hikers settle for the relaxed pace of about 20 km (12 mi) a day.
That is a full but perfectly ordinary day in the mountains: the kind of walk a reasonably fit person does on a weekend, without any special training. If that sounds manageable, you can walk the vast majority of trails in Iceland. Fitness is not the hard part here.
Equipment: what to bring with you
Hiking trips in Iceland require basically the same equipment and preparation as anywhere else in the world, although they certainly have their own peculiarities as well. These peculiarities are due firstly to the fact that the weather here is spring-like at best, and secondly to the fact that it’s practically always blowing really hard.
Video: What equipment to take on a trek in Iceland
Footwear and other walking gear
What shoes to take to Iceland? On a ‘car’ trip, so-called approach shoes will work best. But on a multi-day trekking trip, a good pair of tall mountain boots will certainly come in handy. You can even see people on the trails in worn-out sneakers with holes in them, but we recommend tough and waterproof boots that cover the ankle.
Approach shoes look like typical mountain boots, but “cut off” below the ankle (in the video below: the red shoes in the middle). They are stiff boots, with a thick sole and a waterproof, durable upper, but short, so they are lighter and more comfortable than “full” mountain boots. They are also more convenient for transport. They are great for visiting the attractions of the Golden Circle or those along Route 1, or for a short trip of a few hours, such as to the aforementioned Glymur waterfall.
Video: What shoes work best in Iceland (winter and summer)
However, Icelandic trails are sometimes – like probably all mountain trails – uneven and slippery (here: due to loose scree). Therefore, on longer, multi-day trails, tall mountain boots are best. They give extra protection against twisting or tweaking of the ankle, which becomes fundamental on a longer trip.
Such boots (and tall ones at that!) will also come in handy because of their water resistance. On a multi-day trip, we can’t always wait out the rain, and while thunderstorms in Iceland are practically non-existent, a few hours or even a few days of drizzle is nothing strange. In addition, the ground on the trails is uneven, sometimes (even in summer) you have to walk through a patch of snow, and loose scree or volcanic cinders require you to dig your boot harder into the ground. On the trails you can find hikers in a wide variety of footwear, but these are certainly the conditions for which hard, tall mountain boots were just made. If you have such or can afford to buy them, they will certainly be the best choice. In addition – on longer trips – water shoes will really come in handy. First of all, for crossing streams safely, comfortably and quickly. But such shoes are also useful as footwear for showers or hot springs.

Microspikes
In winter, but in fact from October even to April-May, microspikes can really come in handy. Not full ice crampons, but small metal teeth on little chains, attached to the shoe with a rubber harness – microspikes, or traction cleats. This is a sensational solution. In summer they are unlikely to come in handy, but in winter they can be absolutely essential for many walks, even short, typically touristy ones (Gullfoss, Seljalandsfoss, many others). Certainly, all year round trekking poles are also useful. Due to the aforementioned scree (sometimes steep) and the need to cross streams, poles will come in handy on most trails.
Other than that, normal equipment for mountain hiking is necessary. A rainproof (so-called hardshell) and windproof jacket (and pants), thermal underwear, good socks, a warm fleece. Gloves and a hat – winter ones, or at least fall-weight ones – are also sure to come in handy, even in summer.

Changing shoes before the ford at Hvanngil (July)
A backpack is also necessary, of course, but I guess all the brand-name backpacks offered nowadays are really good. Although – in my opinion – almost the largest capacity currently available, i.e. 75 liters, is the absolute minimum for a longer trip. Although, as I describe a little further on, I usually hike with a really big sleeping bag and an equally big tent. For shorter trips (less food!) and with a smaller sleeping bag, perhaps a 65 liter backpack would also suffice. It is worth making sure that the back system will not pinch your back. Unfortunately, this is not out of the question – systems based on a large plastic back plate, unfortunately, can pinch.

Backpack in a universal rain cover
Pay attention to the length and positioning of the side straps. If you plan to carry, for example, a foam pad and a tent strapped to the sides of the backpack, these straps really should be as long as possible. Large additional side pockets, on the other hand, will get in the way. Also remember about the rain cover. If your backpack doesn’t have such a cover integrated, it’s essential to buy a universal one of the right size. The right size – i.e., taking into account, for example, a tent or a foam pad attached to the sides of the backpack, not just the backpack itself.

Garmin InReach Mini 2
If you’re traveling alone, it’s definitely worth taking a satellite communicator (such as the Garmin InReach Mini) with you. It reads your position from the GPS, allows you to transfer the data later to your phone or computer, but most importantly, it allows you to call for help via the satellite network. If you have an accident that makes it impossible to continue walking on your own, the ability to call for help from any point along the route (and off-trail, if you lose the trail), is absolutely priceless. In the lowlands we have cell coverage virtually everywhere, so a phone should be enough to call for help, but in the interior, by contrast, there is almost no cell coverage, so satellite communication is really helpful.
Remember that there is also no electricity in the interior, so we can’t really rely on devices that require daily charging. And on the other hand, that you absolutely need to take with you as large a power bank as possible, because a smartphone is extremely useful on the trail these days. If you use your phone only for navigation and payments, that is, constantly in airplane mode, and don’t take very many photos and videos, a 10,000 mAh power bank should easily last you up to 10 days.
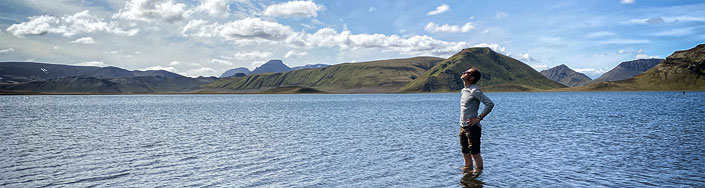
A beautiful Icelandic day
It’s definitely worth taking sunscreen to Iceland. The weather is usually cool and the sun doesn’t rise very high. But when the day is cloudless, there is absolutely nowhere to hide in the shade on Icelandic trails. Your face, neck, hands and other uncovered parts of your body will be in the sun all the time, and after a day or two, this can be a serious problem. If being bitten by midges or mosquitoes is an unbearable thing for you (or you are allergic to them), then also take along a cream to soothe the bites. Nuisance clouds of midges are not standard, but they do happen nonetheless, especially on larger lakes and in windless weather. Fortunately, fighting midges is one of the (few) advantages of the constant, fairly strong wind in Iceland. Sometimes a neck gaiter, bandana or buff is also useful. Because of the volcanic terrain, Icelandic trails often run through fields of volcanic ash and cinders. And when a strong wind blows in such a place, we can find ourselves in the middle of a sandstorm of sorts. Taking goggles would be overkill, but a buff helps then to breathe calmly.
Tent, sleeping bag – sleeping gear
What kind of sleeping bag to take to Iceland

Pinguin sleeping bag, comfort -1 °C (30°F), weight 1.5 kg (3.3 lb)
If you’re sleeping in a tent, it’s best to equip yourself with a sleeping bag with a comfort rating down to 0 °C (32°F). Of course, you are likely to spend many nights in temperatures around 8-10 °C (46-50°F), but it is worth preparing for those colder times.
I myself use a synthetic sleeping bag several years old with a nominal comfort rating of -1 °C (30°F), because that’s just what I have. Of course, thermal comfort at night is influenced by many factors, but – even though I’m a “seasoned” guy of 80 kg (175 lb) – some nights at campsites, even in July, are cold enough that I have to put on extra layers in such a sleeping bag.
Of course, a newer sleeping bag would probably be warmer, and a down sleeping bag would be much lighter and smaller. But also much more expensive. That’s why, since I already have such a big synthetic bag, that’s what I use, even though for me the real comfort limit of this sleeping bag is more like 5 °C (41°F). If you sleep in huts, take a spring sleeping bag – one with a comfort rating of about 10 °C (50°F). In huts it is usually warmer (sometimes even hot), but it is not uncommon to sleep with the windows open, so the temperature in the room is not exactly ‘room temperature’. Of course, in contrast, some huts are just hot at night, but getting out of the sleeping bag is, after all, quite easy, and getting warm on a cold night is much more difficult.
What kind of tent will work in Iceland
Because of the low temperatures and wind, it would be good for your tent to have a flysheet that goes all the way down to the ground and a relatively warm inner tent.
Nowadays, virtually all inner tents are very airy (“superbly ventilated”) and act as mosquito nets rather than protection against cold and wind. From the perspective of Iceland, however, the best would be a tent in which the mesh part of the inner walls starts as high as possible. The tent whose inner can be seen in the photo below is not good for Iceland. Unfortunately, in the part where the mesh begins at the very floor of the tent, the wind penetrates the interior without any problem, making it noticeably windy and just plain chilly inside.
The flysheet and the entire structure of the tent should also be resistant to rain falling in strong winds. Certainly dome tents work well here, especially those in four-season or “three-season” specifications. It doesn’t have to be a typical winter tent, because we don’t even need snow skirts. In classic tents, on the other hand, well-placed guy lines are very important – so that the side wall of the fly cannot touch the inner tent under wind pressure.
It must be said that ultra-light tents are increasingly popular on the trail. Usually single-walled, with the inner acting only as a mosquito net, and not any protection from wind or cold. Such a tent basically consists of the fly alone, as it is pitched on a trekking pole (or two) acting as a mast.
The main advantage of these tents is their small size and even negligible weight. According to hikers we met on the trail, their 2-person ultra-light tents weighed as little as 0.5 kg (1 lb). So compared to our 3-person dome tent weighing about 4.5 kg (10 lb), the difference is colossal. Of course, such an ultra-light tent is also small. That’s good, because it takes up little space in a backpack, but bad, because it’s hard to fit a backpack inside at night, and it’s also quite a challenge to even change clothes inside in the rain without touching the fly. A dome tent, however, is much more spacious. At the same time, manufacturers of ultra-light tents assure that they can withstand strong wind (and rain) due to special shapes, etc. However, almost all the “tents in trouble” videos you can find on the Internet are just tents with a classic, pole-and-mast design, so it’s probably safer to stay with the dome.
If you’re traveling around Iceland by car and carrying a tent in the trunk, a large dome tent is the obvious choice. Icelanders even bring tents to campsites where they could comfortably park their car (seriously!). However, if the tent has to be carried on the back, the choice is more difficult.
The ultra-light tent is, of course, tiny and lightweight, but also unfortunately expensive. And frankly, having seen several such tents at campsites, I am not convinced by the manufacturers’ assurances about high resistance to strong winds. In contrast, a dome (or tunnel) tent, especially in the winter version, will be heavy, but spacious and relatively cheap. Which of these things is more important – everyone must decide for themselves here.
Accessories and extras
Low night temperatures and (at many campsites) hard, cinder ground encourage sleeping on an inflatable sleeping pad or a self-inflating mat. Unfortunately, again: pads that are lightweight and durable will be expensive, and those that are cheap tend to be quite heavy (or not very durable). In terms of equipment carried in a backpack, I am a firm opponent of any pumps. A neat solution, on the other hand, is pads inflated with a kind of pump sack. Such a bag fills easily with air, and then its contents are forced into the pad. The system is very comfortable and lightweight. And at the same time, after letting the air out, it takes up very little space in the backpack. Unfortunately, if it is also made of really durable materials, it is not one of the cheap solutions. Alternatively, a “good old” foam pad is also perfectly fine. The foam pad is bulky and not very soft or comfortable, but it is very light and very cheap. And in addition, even the biggest hole basically doesn’t bother a foam pad at all, while all inflatable pads, unfortunately, have to be patched when something happens to them. In Icelandic conditions, due to the low temperatures, it is definitely worth equipping yourself with a thicker, two- or three-layer pad.

The folding foam pad could not be strapped to the side of the backpack
We did test an ordinary flat foam pad against the more modern folding ‘egg crate’ type. And unfortunately, the folding one turned out to be neither lighter, nor noticeably warmer or more comfortable, while it was completely impossible to strap to the side of a backpack. The square cross-section when folded meant that it was a tad too big to be gripped by the backpack’s side straps. Usually this was not a problem, but when it started to rain and a cover had to be put on the backpack, there was absolutely nothing to be done with this pad… Nevertheless, in general, at least judging by the Icelandic trails, foam pads are definitely going out of use, in favor of lightweight inflatable pads. Of other things, in summer it is really worth taking a sleep mask. It’s the kind familiar from intercontinental flights, ensuring that you sleep in the dark, even though the Icelandic night is short and not very dark. The mask is lightweight and hassle-free, and you get used to sleeping in it very quickly. This is perhaps especially important for those planning to stay overnight in huts, as curtains and blinds are practically unknown in Iceland. It gets bright in the bedrooms as soon as the sun rises, that is, in summer, as early as about 4 a.m. Those who need silence to sleep may also want to bring earplugs. After all, in huts we sleep in large, multi-person rooms, where it is not difficult to find at least one snoring person. And tents are constantly rustling (or even making noise) due to the incessant wind. Indeed – while solitude can be found quite easily in Iceland, true silence is much more difficult to find here due to the wind.
Cooking and eating equipment
If you travel around Iceland by car, you can buy food in supermarkets and have complete freedom of what to eat. Admittedly, a lot of things (meat!) are really expensive, but compared to the overall cost of the trip, frankly, the extra cost of food is unlikely to be a significant budget item (unless you rely on eating in restaurants – that’s something else entirely). If you are interested in the details of what costs how much and where to shop, please see the article Shopping in Iceland: food prices and grocery store opening hours and the other: What to eat in Iceland – interesting dishes and prices in restaurants. Importantly: you will find drinkable water in every stream and at every campsite. It’s worth taking a water bottle with you for the day, but it doesn’t have to be large. A 1.5-liter (50 oz) PET bottle of sparkling water or another beverage, bought before you set out on your trip, works great (although it could easily be smaller, too). Such bottles are very light, very sturdy and very easy to strap to the outside of your backpack.
Given Iceland’s low temperatures and permanent wind chill, a small thermos is also useful. It doesn’t have to be big, especially since it’s better to keep it inside the backpack anyway. Thermoses kept outside the backpack cooled down surprisingly quickly for us in the relentless Icelandic wind.
Cooking under a tent

Freeze-dried meals
If you carry food with you in a backpack, freeze-dried meals are certainly best.
Such dishes are small, light, really tasty and trivially easy to prepare. Their preparation takes a short time (so we save time and gas), but what’s more, a freeze-dried dish can be eaten straight from its package. So you don’t need to take an extra mess kit (or wash it) 🙂 Freeze-dried food is available in quite a wide range. Meat dishes are available, as well as vegetarian or vegan ones. You can also find breakfast dishes, as well as lunch or dinner dishes (large, double portions). Enough variety of the dishes themselves is available that our meals on the trip absolutely do not have to be monotonous. And they certainly don’t have to be so on a short trail of a few days.

Store in Hvanngil
If necessary, we can replenish certain supplies at campsite stores along the way, although this is more likely to be the case at huts on Laugavegur or along larger roads (e.g. Nyidalur). The usual items to buy are candy bars, chocolates, small sweets and a small selection of freeze-dried food or gas for stoves. The exception here is the store in Landmannalaugar, which offers a really wide selection of food and non-food items (more on that in the Landmannalaugar article linked above). Prices at the huts and stores of Ferðafélag Íslands (the Iceland Touring Association) are announced well ahead of each season. Of course, not all campsites and huts belong to this association, but it’s a good indication of typical prices at campsites in the interior. See our information on these prices here: [24.05.2026] New prices on the Laugavegur trail (2026).
Letting out a secret: freeze-dried meals (from the Feed the Viking series) cost 3,500 ISK (about $27) apiece at campsites. Therefore, even if freeze-dried meals seem expensive to you at home, they are certainly not as expensive as in Iceland. If you sleep in a tent, you are not allowed in the hut. You must bring your own camping stove, dishes and the necessary cutlery. Once again: if you decide to eat only freeze-dried food, you will only need one pot in which to boil water (usually the one bought with the stove) and literally one fork to prepare and eat the dish. A super simple, lightweight and efficient system 🙂

‘Kitchen’ at Alftavatn campsite
Some mountain campsites provide all guests with some old stable or barn for use as a canteen. At others there is a special garden tent serving such a role. But on some campsites there is nothing of the sort and we simply cook in front of the tent or against the wall of the hut. Therefore, modern stoves with a sheltered burner, preferably with a heat exchanger, work very well. They are produced by Jetboil and MSR, but also by other companies. These designs firstly speed up the boiling of water itself, and secondly save gas, using much less of it “per session”.

Wind-sheltered burner
Both of these features are very important, because firstly, we can’t always cook in a place sheltered from the wind (for example, in Afangagil or Alftavatn there is no such tent or room), and secondly, after all, we want to carry as little as possible on our backs. And these stoves, while slightly heavier than the ‘ultra light’ version, use much less gas. So the stove itself is heavier than the uncovered version, but we can take a smaller, and therefore lighter, container of gas, or the same container will last longer, so weight-wise we break even. Well, and what we gain is that the cooking itself really takes noticeably less time, so we also wait less for a well-deserved meal. In practice, it took us about 4 minutes to boil a liter (a quart) of ice-cold water straight from the Icelandic tap. And the large gas cartridge (440 g / 15.5 oz) was enough to cook for 13 days, with about a week for 3 people and the second week for 2. In the end, we still had quite a bit of gas left over. I am convinced that for 2 people going for 10 days even just a small cartridge – one with about 220-250 g (8-9 oz) of gas – should be enough.
Cooking in huts

Kitchen (left half) in Landmannalaugar
If you stay overnight in huts on the trail, you can use well-equipped kitchens.
Admittedly, if you’re feeding on freeze-dried food, you’ll use practically only a kettle in the kitchen, but a variety of pots, pans, thermoses, plates, cups and a wide range of cutlery are available. Usually a grill is also available. So you can very well feed yourself in any way you choose.
Not all kitchens are as large as the one in the photo (that’s the kitchen, actually half of the kitchen in the Landmannalaugar hut). But even in the biggest ones it can sometimes be really crowded. Unfortunately, both breakfast and dinner everyone wants to eat at about the same time, so during these peak hours the hut kitchens, regardless of their size, often prove to be too small. This, by the way, is another advantage of freeze-dried food, as boiling water is practically always on hand.
Useful apps and maps
Perhaps it’s a sign of the times, but nowadays in Iceland it’s quite hard to get hold of hiking maps. Road maps are readily available, but usually at a scale of 1:400,000, so they are completely useless for a hiker. Typical hiking maps are also available, but almost exclusively at a scale of 1:100,000. From the perspective of hiking trips, they do not allow for accurate navigation in more difficult areas, and are rather illustrative. The largest scale sometimes encountered is 1:50,000, and these are usually only selected parts of larger maps. Nowhere have we seen a map of a larger area at this scale. Neither in a bookstore, nor in any tourist store, nor from any tourist we met.
Only the most famous Laugavegur trail (and the neighboring Fimmvorduhals, but not Hellismannaleid) “deserved” a special booklet edition of maps of the entire trail at a scale of 1:50,000. However, we saw this booklet on sale only at a stand at the BSI bus terminal.
In addition, Icelandic trails often do not run along mountain ridges and valleys, and quite often they cross flat, landmark-free post-volcanic plains. In such terrain, maps at a scale larger than 1:50,000 would be very useful for effective orientation, but nobody seems to have ever heard of such a thing.

Example screen from Mapy.cz
Therefore, the absolute best solution is an app like Mapy.cz or AllTrails and a map of the area downloaded to the phone. The phone does a great job of showing the trail and our location even when it is in airplane mode. Airplane mode saves battery life, and as a rule there is no cell coverage on the trails anyway.
I myself, out of habit, always take a printed map and compass with me, but in practice, walking on Icelandic trails, I have not taken them out of my backpack even once… It is also worth installing on your phone the safetravel.is app, which informs you about hazards and weather warnings. On this website, you can also register to receive such messages via SMS, during the selected period. The app also provides relatively good and ‘live’ information about volcanic eruptions – which, so far, have been more of a tourist attraction than a threat to hikers (see: the Meradalir eruption of 2022). Finally, it is definitely worth having a local weather app – the one from vedur.is. The vedur.is website is run by the Icelandic Met Office (Veðurstofa Íslands), the national weather service. It is certainly the most up-to-date and accurate weather data in Iceland. In winter, the service also gives a forecast for the occurrence of the aurora borealis. The other thing is that the accuracy of these forecasts (both weather and aurora) is really very, very poor.
Travel insurance

Icelandic roadside assistance in action
There are (almost) no bans on entering dangerous places in Iceland, but there is also no free, state-run mountain rescue service. If we have an accident, we will have to pay (rather steeply) for any help we receive.
EU/EEA citizens with a European Health Insurance Card (EHIC) are entitled to the same care in Iceland as Icelanders (visitors from outside Europe pay the full price for everything), but unfortunately mountain medical transport and hospitalization are NOT free for Icelanders either. Then again, ordinary visits to doctors are not, either. We know of a case in 2023 where a tourist required transport from Laugavegur to the hospital and this transport alone cost him more than 2,000 euros (about $2,370). The care and assistance provided at the hospital cost several times more. So, none of this is cheap. Therefore, in addition to getting an EHIC card if you are eligible (it’s free), it is certainly worthwhile to purchase before the trip the appropriate insurance that covers the cost of mountain rescue and possible medical assistance and hospitalization.
Compared to the cost of assistance on the spot, such insurance will cost pennies.